Wordpress Plugin Development and PayPal
Tutorial 1 : Basic PayPal payment
This tutorial covers how to complete an online payment with PayPal and Wordpress. The idea is covering how the PayPal API works without the PayPal SDKs so that you can understand what happens under the hood when a payment is completed. Several HTTP requests will be made with Wordpress built in functions.
An overview of the PayPal API
When making a payment with PayPal three HTTP requests must be made to the PayPal API. In this case the Wordpress built in functions will be implemented to interact with the PayPal API.
The first request is made to retrieve a PayPal access token which is used to authenticate the subsequent HTTP requests. The client id and the client secret are exchanged for an access token. Those two pieces of data can only be obtained from the PayPal Developers website.
The second HTTP request is made to configure a payment order which holds a detailed description of the payment; it contains details like the amount, the source of payment and the payee.
The response for the second HTTP request contains an order identifier which will be used later on to capture the funds.
Also the response for the second HTTP request contains the URL address of the PayPal page where the payer has to log in and approve the transaction.
The third HTTP request is made to transfer the funds from the payer to the payee. This HTTP request requires the order identifier to complete the transaction.
The third HTTP request must be made right after the payer approves the transaction in the PayPal website.
Sample HTTP request to get PayPal access token
Let’s break down the HTTP request made to get an access token from the PayPal API:
$response = wp_remote_post(
            'https://api-m.sandbox.paypal.com/v1/oauth2/token',
            array(
               'headers' => array(
                  'Content-Type' => 'application/x-www-form-urlencoded',
                  'Authorization' => 'Basic '.base64_encode(self::$client_id.":".self::$client_secret)

               ),
               'body' => 'grant_type=client_credentials'
            )
        );
As you can see the Wordpress function wp_remote_post is used to make the HTTP request.
The client id as well as the client secret are both stored within static properties. Remember that you must get these credentials from the PayPal Developers website.
The response from this HTTP request contains a property called access_token; this token will be used inside the subsequent HTTP requests to authenticate them.
Sample HTTP request to create a PayPal order
Let’s break down the HTTP request made to configure a new PayPal order. Check out the next sample php code:
$response = wp_remote_post(
         'https://api-m.sandbox.paypal.com/v2/checkout/orders',
         array(
            'headers' => array(
               'Content-Type' => 'application/json',
               'Prefer' => 'return=representation',
               'PayPal-Request-Id' => $uuid4->toString(),
               'Authorization' => 'Bearer '.$response_body['access_token']
            ),
            'body' => json_encode(array(
               'intent' => 'CAPTURE',
               'payment_source' => array(
                  'paypal' => array(
                     'experience_context' => array(
                        'user_action' => 'PAY_NOW',
                        'return_url' => $return_url,
                        'cancel_url' => $cancel_url
                     )
                  )
               ),
               'purchase_units' => array(
                   array(
                        'amount' => array(
                           'currency_code' => 'USD',
                           'value' => self::$amount
                        )
                   )
               )
             )
            )
         )
      );
The PayPal-Request-Id header holds a unique identifier to prevent PayPal from creating the same order twice. In case another HTTP request arrives to the PayPal servers with the same identifier then PayPal will ignore it.
The Authorization header holds the access token obtained from the first HTTP request. This token authenticates the HTTP request.
The return url property holds the URL address of the web page where the payer will be redirected to after approving the transaction in the PayPal website.
The cancel url property holds the URL address of the web page where the payer will be redirected to in case the transaction is cancelled in the PayPal website.
This HTTP request will generate a response which contains a property called payer-action which holds the URL address of the PayPal web page where the payer has to approve the transaction.
Sample HTTP request to capture the funds
After the payer approves the transaction in the PayPal website then the payer is redirected to the URL address specified in the return_url property.
The URL address where the payer is redirected to is added a URL parameter called token which holds the order identifier.
The order identifier must be used to make the last HTTP request to capture the funds as shown below:
$response = wp_remote_post(
         'https://api-m.sandbox.paypal.com/v2/checkout/orders/'.$_GET['token'].'/capture',
         array(
            'headers' => array(
               'Content-Type' => 'application/json',
               'Prefer' => 'return=representation',
               'PayPal-Request-Id' => $uuid4->toString(),
               'Authorization' => 'Bearer '.$_SESSION['paypal_access_token']
            ),
            'body' => ''
         )
     );
Note how the URL parameter called token is inserted into the PayPal API endpoint to specify the order to be captured. In other words where the funds will be transferred to.
The remaining HTTP request headers are the same as in the previous requests; the PayPal-Request-Id is used to prevent PayPal from capturing the funds twice and the Authorization header is used to authenticate the request.
Creating the Wordpress plugin main file
Once the PayPal API was covered in the previous sections let’s dive into how the Wordpress plugin can be created to process payments.
The first step is creating the root folder of the project so open the terminal and run the next commands:
$ cd /var/www/html/wp-content/plugins
$ mkdir basicpaypal
$cd basicpaypal
Next the main plugin file must be created into the root folder. In this case create the file basicpaypal > basicpaypal.php. Note how the main plugin file is named after the root folder.
Open the main plugin file and add the next php code snippet:
<?php
\*
Plugin Name: Basic Paypal
Description: This plugin enables a basic paypal payment
Author: Raymundo
*/
The above comment section contains plugin metadata and describes the plugin. You can customize the fields above.
Don’t forget to activate the plugin in the Plugins screen located inside the Admin area.
Configure namespaces and dependencies
Namespaces are categories used to organize the classes and functions. Namespaces are used to prevent code collisions between two classes or functions with the same name.
Navigate to the root folder of the project and create the file composer.json:
$  cd basicpaypal
$ touch composer.json
This configuration file can be used to create namespaces and install dependencies. Add the next code into the file:
{
 "autoload" : {
    "psr-4" : {
            "BasicPayPal\\" : "classes/"
        }
    },
 "require": {
  "ramsey/uuid": "^4.9"
 }
}
The previous code creates the BasicPayPal namespace and maps it to the classes subdirectory. In other words the classes under the BasicPayPal category must be placed inside the classes subdirectory.
The ramsey/uuid dependency will be installed later on. This library will be used to generate the value for the PayPal-Request-Id header which was discussed earlier.
Install dependencies and generate autoloader
Installing the dependencies can be achieved by running the next command inside the root folder of the project:
$ cd /var/www/html/wp-content/plugins/basicpaypal
$ composer install
The dependencies are saved into a subdirectory called vendor which is automatically generated by Composer.
The autoloader is a php program which loads the classes and functions as they are being invoked during the program execution meaning that only the classes and functions being used are loaded. This strategy increases the performance of the application.
Generating an autoloader is simple with Composer. Navigate to the root folder of the project and run the next command:
$ cd /var/www/html/wp-content/plugins/basicpaypal
$ composer dump-autoload
The autoloader will be saved into the vendor subdirectory as well.
Inserting the autoloader into the project
So far the autoloader was created only but it must be included into the codebase so that it takes effect.
Open the basicpaypal.php file and add the next line of php code right below the comment section:
require\_once ABSPATH."wp-content/plugins/basicpaypal/vendor/autoload.php";
Creating the Admin subdirectory
Before creating the first php class declaration let’s add the next subdirectories to the project : classes > Admin.
Also add the next file to the project classes > Admin > rch_bp_Menus.php.
Creating the first class declaration
Open the rch_bp_Menus.php file and add the next php code snippet inside
<?php

namespace BasicPayPal\Admin;
The previous lines of php code are used to create the namespace called BasicPayPal\Admin. This means that the upcoming class declaration will be saved under the BasicPayPal\Admin category.
Below the previous code add the next class declaration:
 class rch_bp_Menus{

    public static function paypal_menu_configuration_html(){


    }

    public static function paypal_menu_configuration(){

    }

    public static function configure(){


    }
}
The static method at the top generates the HTML markup for the admin page where the payment button will be displayed.
The static method at the middle configures a new admin page. It configures settings like the menu item label, menu item icon, page title, menu item position and others.
The static method at the bottom runs the Wordpress hook which is used to make a custom admin page. Hooks allow developers to run php functions to customize what Wordpress does.
Adding the admin_menu hook
The admin_menu hook is used to run the function which configures a new admin page. Insert the next php code snippet inside the configure static method:
add_action(
        "admin_menu",
        [__CLASS__,"paypal_menu_configuration"]
        );
The php code snippet above states that the static method called paypal_menu_configutation holds the php code to configure a new admin page.
Then add the next php code snippet inside the paypal_menu_configuration static method:
 public static function paypal_menu_configuration(){

       $page_hook = add_menu_page(
         "PayPal Payment",
         "Basic PayPal",
         "manage_options",
         "paypal_settings_screen",
         [__CLASS__,"paypal_menu_configuration_html"],
         "dashicons-admin-generic",
         10
       );

    }
The add_menu_page function is invoked to create a new admin page and requires the next parameters:
- The first parameter is the value for the admin page title.
- The second parameter is the menu item label.
- The third parameter is the permission required to access the admin page.
- The fourth parameter is the URL address slug. That is the portion of text which describes the admin page inside the URL address.
- The fifth parameter is the function which generates the HTML markup for the admin page.
- The sixth parameter is the icon for the menu item.
- The seventh parameter is the position of the menu item inside the left sidebar of the admin area.
The paypal_menu_configuration_html static method will output all the necessary HTML markup for the admin page.
  public static function paypal_menu_configuration_html(){

      ?>
       <div class="wrap">
          <h1>PayPal Payment</h1>
          <form  method="post" action="<?php echo admin_url("admin-post.php")?>"/>
              <input type="hidden" name="action" value="create_paypal_order"/>
              <button
                 name="create_paypal_order"
                 type="submit"
                 style="background-color:blue;padding:12px;color:#fff;font-size:15px;margin-top:2em;">
                   Pay Now
              </button>
          </form>
       </div>
      <?php
    }
Let’s break down the HTML markup above. By default, Wordpress requires that all the HTML markup be placed inside a pair of div tags with the wrap class.
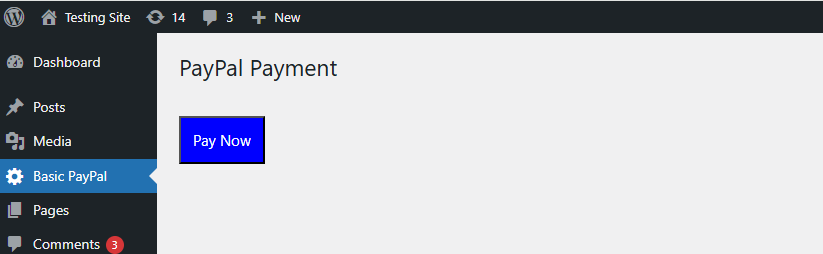
In short, the admin page displays a header and a Pay Now button at the bottom.
Note how the Pay Now button is located into an HTML form. The HTML form data must be submitted to the admin-post.php file that is the standard way to handle POST data in Wordpress.
The hidden text field holds the create_paypal_order value which is the name of the hook which will be run in the backend to handle the POST data. Remember that hooks are used to run custom php code in Wordpress and customize the website user experience.
After the previous code is implemented the resulting admin page looks as shown below:
Creating the Payment subdirectory
Navigate to the root folder of the project and create the subdirectory classes > Payment. Thereafter create the php file classes > Payment > rch_bp_PayPal.php.
Creating the second class
Open the rch_bp_PayPal.php file and add the next lines of php code at the top:
<?php

 namespace BasicPayPal\Payment;

 use Exception;
 use Ramsey\Uuid\Uuid;


 if(!session_id()){


   session_start();


 }
The php code at the top defines the category BasicPayPal\Payment. The upcoming class will be saved under this new category.
Below the dependencies are defined; in this case the Ramsey dependency will be used to generate the value of the PayPal-Request-Id header.
Finally a new session is initialized. A session variable will be used to save the PayPal access token and use it at different moments during the program execution. Remember that the PayPal access token is used to authenticate the HTTP requests.
Then add the next class declaration into the php file:
  class rch_bp_PayPal{


   public static $client_id = "your-paypal-clent-id";
   public static $client_secret = "your-paypal-client-secret";
   public static $amount = 1.00;


   public static function create_paypal_order(){


   }


   public static function capture_payment(){


   }


   public static function configure(){


   }
}
Note how three static properties were defined at the top. Two of them will be used to save the paypal client id and the paypal client secret. Those values must be retrieved from the PayPal Developers website. The last static property simply holds the amount to change to the payer.
The static method at the bottom is used to configure the hook which will be run at the moment when the payer submits the HTML form:
public static function configure(){


      add_action(
        "admin_post_create_paypal_order",
        [__CLASS__,"create_paypal_order"]
      );


   }
Keep in mind that the HTML form contains a hidden text field with the value create_paypal_order which is the name of the hook above. The second parameter is a reference to the static method which runs on HTML form submission.
Let's dive into the create_paypal_order static method. This method is invoked to create a PayPal order and performs two operations : one is creating the access token and the other one is creating the order. Note that this method runs just after the payer submits the HTML form.
Add the next php code snippet into the create_paypal_order static method:
public static function create_paypal_order(){


      try{


      //access token


        $response = wp_remote_post(
            'https://api-m.sandbox.paypal.com/v1/oauth2/token',
            array(
               'headers' => array(
                  'Content-Type' => 'application/x-www-form-urlencoded',
                  'Authorization' => 'Basic '.base64_encode(self::$client_id.":".self::$client_secret)


               ),
               'body' => 'grant_type=client_credentials'
            )
        );


        if(is_wp_error($response)){


          throw new Exception("Cannot get access token",100);


        }


        $response_body = json_decode(wp_remote_retrieve_body($response),true);


      $_SESSION['paypal_access_token'] =     $response_body['access_token'];
The first part makes an HTTP request to get an access token from the PayPal API. This HTTP request was explained earlier.
In case the HTTP request fails then an EXception is thrown. Later on the php code which handles the exceptions will be added.
Note how the access_token property is extracted from the response and saved into a session variable so that it can be used later on when the payment is captured.
Let's move on to the PayPal order HTTP request. Add the next php code snippet right below the previous code:
//create order

      $uuid4 = Uuid::uuid4();


      $return_url = add_query_arg(
         array(
            "page" => "paypal_settings_screen",
         ),
         admin_url("admin.php")
      );


      $cancel_url = add_query_arg(
         array(
            "page" => "paypal_settings_screen",
         ),
         admin_url("admin.php")
      );


      $response = wp_remote_post(
         'https://api-m.sandbox.paypal.com/v2/checkout/orders',
         array(
            'headers' => array(
               'Content-Type' => 'application/json',
               'Prefer' => 'return=representation',
               'PayPal-Request-Id' => $uuid4->toString(),
               'Authorization' => 'Bearer '.$response_body['access_token']
            ),
            'body' => json_encode(array(
               'intent' => 'CAPTURE',
                       'payment_source' => array(
                  'paypal' => array(
                     'experience_context' => array(
                        'user_action' => 'PAY_NOW',
                        'return_url' => $return_url,
                        'cancel_url' => $cancel_url
                     )
                  )
               ),
               'purchase_units' => array(
                   array(
                        'amount' => array(
                           'currency_code' => 'USD',
                           'value' => self::$amount
                        )
                   )
               )
             )
            )
         )
      );


       if(is_wp_error($response)){


          throw new Exception("Cannot get payment order",200);


        }

        $response_body = json_decode(wp_remote_retrieve_body($response),true);


      //redirect to PayPal site


      wp_redirect($response_body['links'][1]['href'],301);


      exit;


      }catch(Exception $e){


      }
The $uuid variable holds an instance of the class provided by the library. This instance will be used to generate a unique identifier later on.
Once the PayPal order is created then the payer will be redirected to the PayPal website so that the payer approves the transaction. After the payer approves the transaction then Paypal will redirect the payer back to the admin page. At this point the URL address of the admin page will have a parameter called token which holds the order identifier. This order identifier will be used to capture the payment.
After the payer approves the transaction in the PayPal site the payer will be redirected to the return url otherwise the payer will be redirected to the cancel url.
The add_query_arg function is invoked to configure both the return and the cancel URL addresses. This function is used to add the slug of the admin page created earlier as a URL parameter.
Next the HTTP request is made which generates a PayPal order. Note how the PayPal-Request-Id header is given a value by using the $uuid instance.
Also note how the Authorization header value is obtained from the response of the first HTTP request.
Finally at the bottom of the previous php code the wp_redirect function is called to take the payer to the PayPal site.
Let’s cover the capture_payment method. This method will run automatically after the payer is redirected back to the admin page.
Add the next code snippet to the capture_:payment static method:
 public static function capture_payment(){


if(!isset($_SESSION['paypal_access_token']) || !isset($_GET['token'])){


        return;


     }
 }
The payment capture requires two pieces of data to work: the PayPal access token and the order identifier. Keep in mind that the order identifier is saved into the $_GET[‘token’] variable and PayPal adds this URL parameter when the user approves the payment.
The above if-block checks whether those pieces of data are available otherwise the payment capture is skipped and the funds are not transferred.
Let’s add the next php code snippet right below the previous if-block. The next php code snippet captures the funds by making an HTTP request to the PayPal endpoint and using the $_GET[‘token] variable as an URL parameter.
 try{


        $uuid4 = Uuid::uuid4();


     $response = wp_remote_post(
         'https://api-m.sandbox.paypal.com/v2/checkout/orders/'.$_GET['token'].'/capture',
         array(
            'headers' => array(
               'Content-Type' => 'application/json',
               'Prefer' => 'return=representation',
               'PayPal-Request-Id' => $uuid4->toString(),
          'Authorization' => 'Bearer '.$_SESSION['paypal_access_token']
            ),
            'body' => ''
         )
     );


     if(is_wp_error($response)){


        throw new Exception('Unable to capture payment',300);


     }


 $response_body = json_decode(wp_remote_retrieve_body($response),true);
The $uuid4 variable holds an instance of the uuid library which is used to generate the value for the PayPal-Request-Id header.
Also note that the Authorization header gets its value from the $_SESSION[‘paypal_access_token’] variable.
In case the HTTP request fails then an Exception is thrown with a descriptive error message.
Finally add the next php code snippet to the static method:
$destination_url = add_query_arg(
           array(
              'page' => 'paypal_settings_screen',
              'success' => 'true'
           ),
         admin_url("admin.php")
      );


      wp_redirect($destination_url);


      exit;


     }catch(Exception $e){


     }


   }
The above php code redirects the payer to the admin page with an special URL parameter to indicate the transaction was completed.
As mentioned earlier the above static method must be run automatically after the payer approves the transaction in the PayPal website. Therefore let’s add an special action hook inside the rch_bp_Menus class; specifically into the paypal_menu_configuration static method as shown below:
 public static function paypal_menu_configuration(){


       $page_hook = add_menu_page(
         "PayPal Payment",
         "Basic PayPal",
         "manage_options",
         "paypal_settings_screen",
         [__CLASS__,"paypal_menu_configuration_html"],
         "dashicons-admin-generic",
         10
       );


       add_action("load-".$page_hook,['\BasicPayPal\Payment\rch_bp_PayPal',"capture_payment"]);


    }
The load- action hook runs when a given page is loaded. This hook is the perfect match to make the payment capture code run automatically after the payer approves the transaction in the PayPal website.
The $page_hook variable holds the identifier of the admin page. Note the way the capture_payment static method is referenced above.
The final step is adding the HTML markup necessary to display the payment confirmation. Add the next HTML markup inside the paypal_menu_configuration_html static method:
 public static function paypal_menu_configuration_html(){


    if(isset($_GET['success'])){


      ?>
        <div class="wrap">
              <h1>PayPal Payment</h1>
           <h2 style="margin-top:3em;margin-bottom:3em;">
            <svg xmlns="http://www.w3.org/2000/svg" width="24" height="24" fill="currentColor" class="bi bi-check2-square" viewBox="0 0 16 16">
  <path d="M3 14.5A1.5 1.5 0 0 1 1.5 13V3A1.5 1.5 0 0 1 3 1.5h8a.5.5 0 0 1 0 1H3a.5.5 0 0 0-.5.5v10a.5.5 0 0 0 .5.5h10a.5.5 0 0 0 .5-.5V8a.5.5 0 0 1 1 0v5a1.5 1.5 0 0 1-1.5 1.5z"/>
  <path d="m8.354 10.354 7-7a.5.5 0 0 0-.708-.708L8 9.293 5.354 6.646a.5.5 0 1 0-.708.708l3 3a.5.5 0 0 0 .708 0"/>
</svg>
             Payment Completed
            </h2>
        </div>
      <?php


      return;


    }

      ?>
The above code snippet checks whether the $_GET[‘success] variable is available or not and displays the payment confirmation accordingly.